Adding a three season sunroom

Hello everyone! It’s been awhile. I’m not sure about you, but for me, it’s been hard to get motivated lately. So in the interest of focusing on something else, besides Covid, I’m sharing my three season sunroom plans.

The dead of winter is really the ideal time to make exterior design plans. Like so many of us, I’ve been focusing on my home. So I’ve been playing with our backyard design for the last few months. And we’ve just taken the first step towards getting a functional and oh so pretty backyard.

Our bungalow model, has a small covered area at the back. As soon as we saw it, we pictured a three season sunroom.

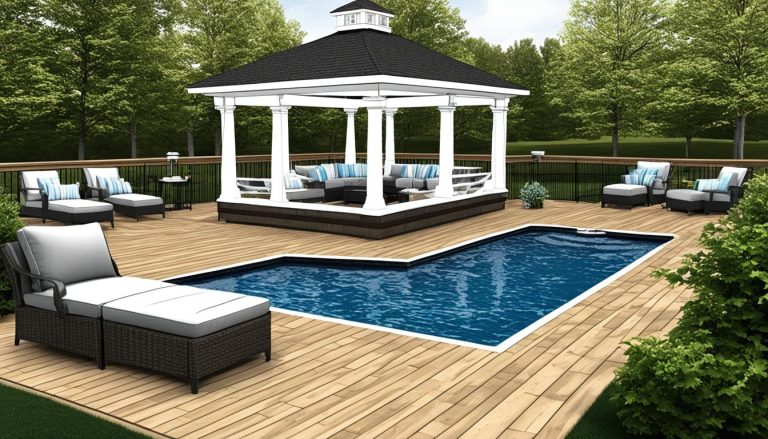
Here’s a couple of my 3D renderings showing what I’ve come up with so far.

Three season sunroom rendering
A bird’s eye view

It’s the area at the top left corner in the floor plan below. (Our house is actually the reverse of this plan. Click here to see more about our bungalow.) As you can see it’s very tiny. About 9′ x 9′. Just enough room to have a few chairs, maybe a couple of ottomans, and a small table.

Bungalow floor plan

Construction starts this spring! We’ll have it enclosed by adding a deck floor and then putting in Weatherwall windows and a door. I haven’t used these types of windows before but they are perfect for this application. They are clear heavy gauge vinyl that will spring back to shape if pushed on. The four section windows open by stacking up on themselves.

Below is an inspiration photo we saw when driving around town one day. Our windows won’t go to the floor though, as we will be putting some sort of siding at the bottom.

Inspiration photo of three season sunroom

Our existing windows, doors and roof are all black, so we will be keeping it harmonious and doing the same with the sunroom. With the tiny wall area in the sunroom, I’m leaning towards installing black horizontal siding inside and out. I haven’t completely decided on that yet, but I think it looks pretty darn good in my 3D renderings above.

Exterior bungalow
Front exterior of our bungalow

This is just the first phase of the backyard project. We are planning to add a hot tub, two level deck, fencing and a pergola over the next few years. Having a long term plan is crucial when doing any type of construction in stages. You can have a tiny peek of what I’m thinking in my renderings above. It’s a tiny yard, so I want to make it functional, pretty and very, very low maintenance.

Yet another reason to look ahead to spring!

How to design and furnish a sunroom

Boy, it’s a hot summer here so far. So in honour of the season, I’m sharing my log room sunroom that I designed and furnished when we bought our log home a few years ago. So whether your sunroom is actually a covered porch, a screened in 3 season room, a Muskoka room or a free standing gazebo, these tips will help you.

Here’s how one side of the sunroom looks now.

Log home sunroom

And the other side.

Sunroom design

blue log cottage sunroom

Blue log cottage sunroom

This is what I started with.

Before sunroom

I bought more substantial and darker wicker furniture and had the cushions made with sunbrella fabric so that there was no worry about sun damage or a wet bathing suit. I chose blue fabrics that complemented each other but that were not the same for interest. Instead of a coffee table I went with an ottoman. It can be used for your feet, as an extra seat or for putting a tray on and using as a table.

Blue log cottage sunroom

The various throw pillows were made by me and I selected more contrasting patterns but with the same colours of blue as in the upholstery. I primarily used blue in this room but with little touches of a soft green. It shows up on the table base, on candle holders and on a few other decorative accessories.

blue log cottage sunroom

A small corner shelf adds a little display area and makes the corner interesting. A little round glass table holds a table lamp and in the other corner a larger table is for display and to place a drink or two. A floor lamp brings much needed light into this corner.

blue log cottage sunroom detail

My grandfather’s ice saw from the early 1900’s takes pride of place over the window. You can just see it on the picture below. An indoor/outdoor rug with a fun french poem written on it anchors the seating area.

blue log cottage sunroom

The little piano stool, from a barn sale, is painted a fun turquoise that matches the curio cabinet in the living room.

Turquoise piano stool used as table in sunroom

And here’s how the other side of the room looked like before.

before sunroom

First up we had to do a repair on the floor tiles right in front of the door. Since the existing terracotta tiles were not available nor would they have matched I went with a different pattern terracotta tile for this area, I think it makes it look like an accent rug.

blue log cottage sunroom

We also took out three of the six skylights as the lower ones were too close to the edge of the roof and leaked all the time. We kept it as an eating area and this is also where we often play cards. Removing the shelf allowed for a larger table and chairs. I also hung a black industrial style pendant light. And for a little bit of fun, I painted and placed some old oars as wall art on this wall.

log cottage detail

Log cottage sunroom

The other side of the room, which you don’t see has a large bookcase across from the table. And there are two sets of french doors which take up the rest of the wall space.

Sunroom detail

If you’d like to read about the other rooms in my log cottage, click on the links below. And stayed tuned, as I’ll be sharing more of the rooms throughout the summer. You can also read about my log cottage feature online in Ottawa at Home’s summer edition by clicking here. 

Log cottage living room 

Log cottage bathroom 

All photos except before pictures:  Melissa Kew Photography

How I designed and updated a log cottage living room on plan and on budget

Since lots of you had questions and wanted to see a bit more about our log cottage that was published in Ottawa at Home summer edition, I thought I’d share how I designed and updated the cottage living room on a plan and with a fairly strict budget.

Here’s how it looks now.

Log home living room with white sofas and blue swivel chairs

Photo credit: Melissa Kew Photography

Since it is a large living room, I worked mostly with the furniture left behind and what we brought from our other cottage. By repurposing and reimagining a number of pieces I was able to keep within our budget.

Pictures do say a thousand words so here’s a quick breakdown of what changed in the cottage living room.

Before picture of log cottage living room with design changes

The sofa and love seat were great quality and in perfect shape, so I quickly decided to slipcover them in a white denim. Slipped off and washed at least once a year they stay clean and fresh. And putting throws where they are likely to get soiled helps keep them clean longer. I love that they make the room a little brighter as all wood interiors can get dark.

Donating the traditional area rug to a shelter allowed me to have a faux sisal wall to wall rug cut and bound to size. This is the perfect thing to do when you need a specific size or a very large area rug. It has held up nicely and it hides sand very well.

Removing the swag drapery treatments lets the view speak for itself. Privacy isn’t an issue and with the large roof overhand that is typical of log buildings, sun damage isn’t either. Simpler and more light, both big pluses in my book.

Even if the large clock and console were left by the previous owner, I would have removed both of them,  as there was far too much furniture in the space.

I relocated the existing occasional tables within the cottage and purchased an end table and coffee table from Urban Barn, with a lucky gift card win. Made from repurposed wood they have the rustic feel and look I was going for. Though they do strike a bit of a challenge when placing your drink on them, with their uneven surface.

My grandfather’s travel trunk from the early 1900’s replaced the other end table. I just had a piece of glass cut to fit the top and it has been the perfect thing. If you want to learn more about cottage decorating click here to read an Ottawa Citizen article that I contributed to.

Antique trunk fitted with a glass top to use as a table

Photo credit: Melissa Kew Photography

And on the other side of the cottage living room.

Before picture of living room with design changes

We upgraded the wood pellet stove for a wood burning insert. Well worth the change both aesthetically and financially, as it has lowered our heating bills substantially in the winter.

The two pink swivel chairs were functionally perfect for the space. Even more so after I added the tv behind them, so now you can swivel to watch the fire or tv. With their threadbare pink fabric, they needed a makeover.  By raising them up a few inches (they were quite short) and reupholstering them in an exterior fabric they will be used and abused for many years.

log home living room with white slipcovered sofas

Photo credit: Melissa Kew Photography

New foam and a durable exterior fabric completely updated the window seats. The pillows are a combination of ones I have made, knitted or picked up at various shops.

Adding my own decor items, like the large clock above the mantel, makes it feel more like us. Since this picture was taken this clock has been switched out for an even larger metal industrial one. Antique books, candles and other decor items are displayed on the mantel itself.  You can’t quite see them in these pictures,  but I used images from a great desk calendar and put them in inexpensive frames. By stacking them on top of each other, it gives them a bit more presence on the wall.

Originally this floor lamp was gold plated and very dated. I painted it black and bought a new drum shade to give it a new lease on life.

Cottage living room with stone fireplace

Photo credit: Melissa Kew Photography

The cute little turquoise cabinet, a hand me down gift from a neighbour, got a fresh coat of paint. The swing chair lives here in the winter and in the summer it is enjoyed on the back deck.

Obviously, budget wise we didn’t do this all at the same time. Being one of our most used spaces, it was high on the priority list. I had a plan and as cash became available I just kept going down my list. That is really the key…to have a plan. You may find things as you go along that aren’t in the plan. That’s okay just as long as you have a good idea of where you are heading. That will also help you to avoid getting off track by spending more money then is necessary.

How can I help you design your living room?

Simple and easy turquoise accented Christmas urn

As promised, here’s my turquoise Christmas urn and wreath at my city house. As you can see I went with turquoise accents on my Christmas urn, this year.  I love the way the turquoise stands out against the evergreens.

img_4500

And a close up.

Closeup of turquoise and evergreen exterior urn

It was super quick this year, I just picked up some cedar and boxwood branches from Loblaws and I used some leftover pine branches that I had brought home from the country and layered them together.  I added in the huge pinecones, which I always seem to use,  along with some birch branches.

I’ve used the turquoise bow and butterfly before and I just pulled them out of my supplies and that was it.  Quick, simple and inexpensive

I also picked up a ready made boxwood wreath and just added a few pinecones and another turquoise butterfly for a super simple DIY.

Exterior christmas wreath with turquoise accents

I love the way the turquoise and green pops against the dark brown door.  Hopefully the boxwood wreath will hold up all winter.

Exterior urn and wreath with turquoise accents

Exterior christmas urn with turquoise accents.

If you haven’t seen my first Christmas urn I did last week for my cottage, you can see it here.

I also decided to go back and share some of my previous exterior urns and decor from years past. I think you’ll see that I stick with a pretty similar style, year and year.  And they may give you some inspiration to get yours done, if you haven’t already.

exterior-christmas-urns-001

So let’s see your Christmas urns!

Lisa

This year’s country christmas urn

After our 15-25 cm of snow this weekend, it now looks just like Christmas here! So pretty but NOT so great for driving.

fullsizerender-18-3

This past weekend, I got my country log home ready for the holidays (minus the real tree). Have you started your decorating yet?  Yesterday, I did my country home’s Christmas urn and the rest of my entrance’s decor. I rarely have a plan for this, I just go where I’m feeling it, and this is the result.

Exterior Christmas urn with snowflakes

I found these adorable wooden snowflakes at Wicker Emporium last year and I was excited that I fit them into this year’s decor. I kept it pretty simple and rustic with some pine branches, cut from our own trees, my old standby birch branches (from my neighbour’s lot) and some bought cedar branches, as we don’t have cedar on our property.

Closeup of christmas urn with snowflakes

I added in some red dogwood branches in the middle (from my backyard in the city) and of course, a huge pinecone and a sparkly bow to finish it off.

Exterior christmas sled

I also did up my vintage sled and two of the lanterns that I had spray painted black (from their original rusted silver) this summer.

Exterior christmas lantern

Exterior christmas entry with urn and sled

Please ignore all my little wet footprints, everywhere.

Exterior christmas sled

Exterior Christmas urn and lantern

Later this week I’ll be sharing my city home’s Christmas urn and I’ll be taking a look back at ALL THE ONES I’ve done in year’s past. Wish me luck finding all those old pics.

Exterior Christmas urn with snowflakes

What does your Christmas urn look like?

Lisa